NEWBOOK INTEGRATION
Connect your Newbook with Outdoorsy
This article will guide you in syncing your Newbook account with Outdoorsy for real-time availability, rates, and reservations.

If you've already connected Newbook with Outdoorsy and want to add another campground, follow the steps below. Each campground needs its own instance ID.
Inquire Instance Token

Begin by reaching out to Newbook support via email (support@newbook.cloud) to request the Outdoorsy connection Instance Token. The Instance Token serves as the "key" required to link your Newbook account to Outdoorsy, typically resembling "US-1234".
Keep this token saved until the final step.
Navigating to 3rd Party Booking Channels Page

Next log into your newbook account that you wish to connect with Outdoorsy.
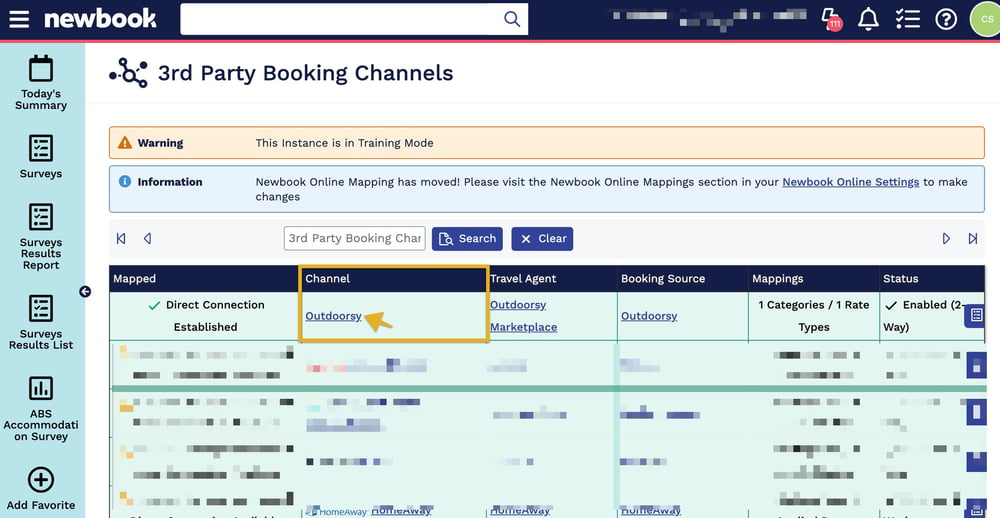
In the Newbook navigation menu, select Administration > Newbook Administration > 3rd Party Booking Channels.
.jpg?width=1000&height=503&name=Image%202024-02-09%20at%209.01.41%20AM%20(2).jpg)
Navigating to Channel Setting & Mapping Page

On the "3rd Party Booking Channels" page, in the "Channel" column, select "Outdoorsy link" to access the Channel Settings & Mapping page.

Configure Incoming Booking Details settings

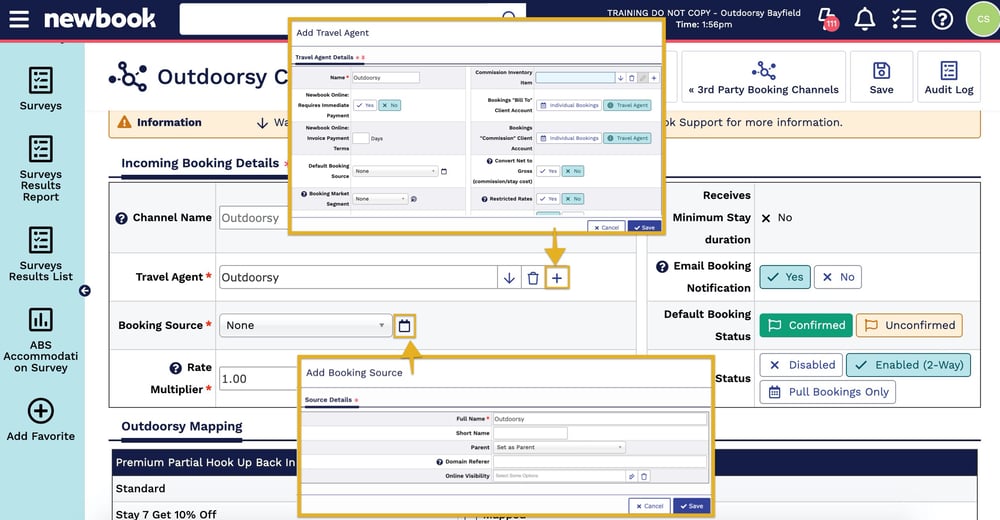
Configure the "Incoming Booking Details" settings. If you should experience any technical difficulties with your settings please reach out to Newbook Support for assistance. (support@newbook.cloud)
Channel Name: Outdoorsy
Booking Source: Create a new Booking Source, click on the ‘+/calendar’ button.
- - Full Name: “Outdoorsy”
- - “Save” in the bottom right corner
Travel Agent: Create a new Travel Agent, click the ‘+’ button:
- Name: Enter "Outdoorsy Marketplace"
- Newbook Online
- - Requires Immediate Payment: No
- - Invoice Payment Terms: [leave blank]
- Default Booking Source: Outdoorsy
- Booking Market Segment: None
- Guests Receive Automated Booking Contact: [Yes/No] Note: Outdoorsy sends the guest confirmation emails too
- Commission Inventory Item: [leave blank]
- Bookings “Bill To” Client Account: Travel Agent
- Bookings “Commission” Client Account: Travel Agent
- Convert Net to Gross (commission/stay cost): No
- Restricted Rates: No
- Active: Yes!
- Travel Agent Commission
- - Default Commission: 0
- - Commission Type: Percent of Booking Total
- Contact Details
- - Phone: (877) 723-7232
- - Email: invoices@outdoorsy.com
- Save from the top down navigation bar
Rate Multiplier: Enter 1.00 here. Outdoorsy suggests parity with your direct booking rates.
Receives Minimum Stay Duration: Set to "Yes". This setting confirms whether or not Outdoorsy receives the minimum nights stay information.
Email Booking Notification: Set to "Yes". This setting allows you to choose whether or not you would like to receive a Newbook Booking Notification. Please Note: Error emails will always be sent – this setting does not affect your error emails.
Default Booking Status: Set this to "Confirmed". When a booking is sent from Outdoorsy into Newbook, the booking will use the Booking Status selected here.
Status: Select Enabled (2-Way). This will allow Newbook to send Outdoorsy availability and rates, and Outdoorsy to send bookings to Newbook.

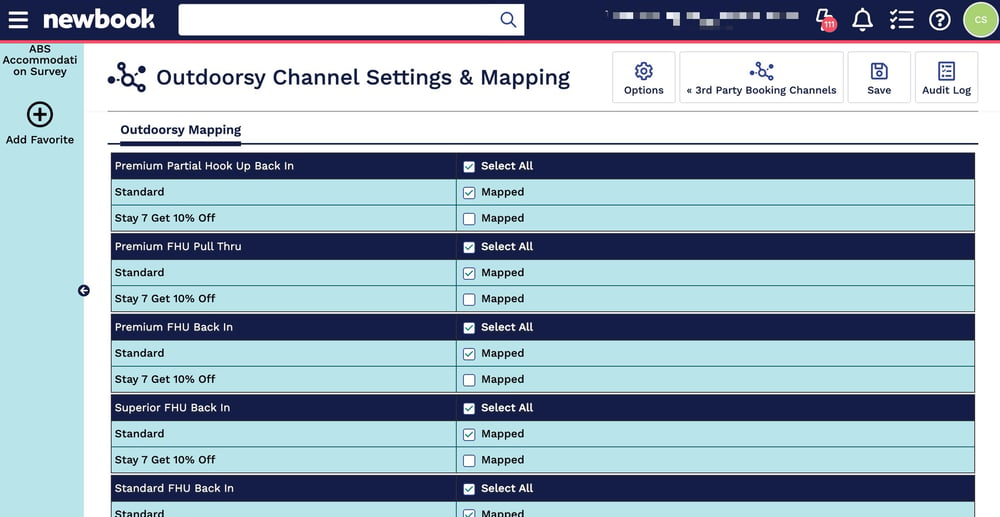
Configure rates mapping

Back on the "Outdoorsy Channel Setting & Mapping" page, under "Outdoorsy mapping" choose the rate you want to use in Outdoorsy for each Room/Site type by selecting the "Mapped" checkbox.

Send Instance Token to Outdoorsy

As a last step in your Settings and Mapping, please email us at campgrounds@outdoorsy.co and provide the Instance Token you received from Newbook in Step 1.